Saturday, December 19, 2009

My first attepmt at scenic stamping


Well folks, here are my first 2 attempts at scenic stamping. Let me know what you think.

Monday, September 7, 2009

Some new things I made


Well, I was a busy little bee tonight packaging cards for a show this coming weekend and making some new things. I hope you like them. Let me know what you think.

My new card rack


Thank you so much Donna and Sue for my new card rack. Love it!!!

Sunday, September 6, 2009

my first ATC


I created this atc for a swap that will be happening at the rubber stamping convention that I am going to in October. The theme for the atc is "tailgate party". Let me know what you think!

Wednesday, August 19, 2009

Cutesy felt onesie


Here are a couple of cute felt onesies I made. I got the template from www.houseofstirfry.com/chia. check out her site she has got some great templates.

new stuff using digi stamps


I found these absolutely adorable digi stamps and just had to make something. I am loving the digi stamps- don't have to clean or store them!

Friday, August 7, 2009

Bad blogger

I know bad blogger. I was doing so good posting regularly and then got busy. Well I am back stay tuned for some awesome new projects.

Saturday, July 18, 2009

Just some things I made this week.

Hope you like them. Leave a comment and let me know what you think. Have a great weekend!


Monday, July 13, 2009

Tumbled tile coaster


Materials used:
Bird on rail from The Angel Company’s All Things Nature
Black Staz-on ink
Dove blender pen
Painters tape
Unglazed tumbled tile
Cork circles
Matte finish spray
Pastel chalks
Heat gun

Directions:
Carefully clean the tumbled tile with a baby wipe. Dry thoroughly. Using the black
Staz-on ink, stamp the image on the front of the tile. Set the ink with the heat gun. Use the Dove blender pen to color in the image with chalks. Tape off the image with the painters tape and then seal just the image with the matte sealer. This will ensure the image doesn’t fade an that the rest of the tile that is not sealed in will still absorb the condensation from a glass. After it is dry, apply the cork circles to the back of tile to make sure it doesn’t scratch a table.

Floor laminate sample magnet


Materials used:
You rock boy from The Angel Company’s Kid Praises stamp set
Black Staz-on ink
Gingham ribbon
Acrylic paint
Matte sealer
Floor laminate sample (I got mine at Home Depot)
Small magnet
Heat gun

Directions:
Using Staz-on ink, stamp image on front of floor laminate sample. Run the heat gun over the image for a few seconds to set the ink. Color the stamped image with your choice of acrylic paints. Let dry overnight. Spray the image with matte sealer. Attach the gingham ribbon through the whole in the front of the laminate sample. Then attach magnet to the back.

Altered composition book


Materials used:
Butterfly from The Angel Company’s Bug me anytime set
Brown ink
1 3/8” square punch
1 sheet of tan cardstock
2 sheets of 12x12 paisley paper
2 sheets of 12x12 light brown paper
1 sheet of light pink (blush) cardstock
6 silver eyelets
6 bronze eyelets
sand paper
composition book
Crop-a-Dile

Directions:
Using a pencil, trace the front and back outside cover of the composition book on the backside of both pieces of paisley paper. Do the same thing with the light brown paper only trace the inside of the covers. Cut out the outlines you made of the covers. Using your choice of adhesive, attach the 2 inside covers to the composition book. Next take the outside covers and line them up against the black binding then attach. Take the sand paper and smooth around the corners of the composition book. It makes the book look better and gives the pages a nice aged look. Using the tearing ruler, tear off a piece of the blush cardstock. Make sure you tear it on the other side too. Cut to size to cover the black binding on the composition book. Before adhering the blush cardstock, attach the eyelets. I put 2 right together and then spaced the next group 1.5 inches from the first one. After you have all the eyelets in, attach the blush binding to the book. Be sure to just use adhesive on the edges of the blush binding not the middle. If you adhere the middle, the book will not open right. Using the square punch, cut 3 blush squares out and then 3 tan squares. Use the brown ink, stamp the butterfly on the blush squares. Adhere the tan squares so they look like diamonds. Then adhere the blush squares over the tan.

Tuesday, June 30, 2009

Cute little magnets


Hi all,
Just wanted to share some cute little magnets I made. The "dream on" magent was made using a mini clip board I picked up at A C Moore. The other 2 magnets were made using flooring samples. Very simple and make cute little gifts.

Monday, June 29, 2009

Sunday, June 28, 2009

Using stamps to create home decor


Stamps can be used in so many ways. There is really no end to the posibilities when it comes to stamps. Above I have created 3 paintings using stamps. In the bord and mother & child pictures I used water colors to enhance the stamped image. In the girls on the beach painting, acrylic paints were used.

Tumbled tile coasters


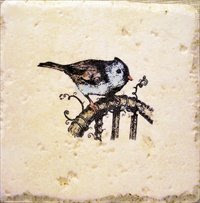
Here are two of the tumbled tile coasters I made for a recent craft show. The stamp set used is "All things nature" from The Angel Company. I stamped the image using black Staz-on ink. I then colored each tile in using chalks. I used painters tape to block off the image and then sealed the image of the bird only. I only sealed the bird to ensure that the image would not fade and that the tile would still absorb any moisture. I am going to be teaching a class on this on July 25th at 7pm in my home studio. Please email me at stampergirl75@comcast.net for more details.


Tuesday, May 5, 2009


Pretty flower

Very, very simple card using two step stamping. I first stamped the solid flower image in the lighter yellow ink. I then stamped the outline of the flower image in orange over the top of the previously stamped solid flower image.

Half Cracked

Another fun card using a simple technique. I stamped the ducks on twice on two different pieces of white cardstock. One image I colored in with pencil crayons. The other one I used a very sharp pair of scissors to cut out the top and bottom of the egg. I then placed a pop up dot on the top and then placed it over the top on the image I colored. I then did the same thing with the bottom. I stamped some fun ribbon to the side of the white cardstock for a fun look.

"A little dirt never hurt"

This card uses the tearing technique. I first used Versamark to stamp the frog background on the green cardstock. I then used a tearing ruler to tear the very bottom of the card. After tearing, I stamped Happy Birthday right on the bottom of the card so that you can see it when looking at the front of the card. The rest of the card was just as easy. I stamped the little boy on white cardstock and colored him in with pencil crayons. I then used a tag punch to cut out a tag and then stamped
"a little dirt never hurt" on the tag.

Friendly Lion
The cute little friendly lion card was done using watercolor pencils to create a soft effect on the lion. I again used brown Palette ink. After stamping the image, I used watercolor pencils to do a deep outline of the lion. I then used a wet paint brush to pull the color from the outline into the middle of the image.

Beautiful Butterfly

This card was made using faux stitching and stamping off techniques. I stamped the butterfly on blue cardstock using brown Palette ink. I first stamped the butterfly directly on the cardstock after inking the stamp. Instead of re-inking the stamp, I immediatly stamped the image again to obtain a lighter butterfly. To make the holes for the faux stitching I used a tracing wheel. I then basically played connect the dots to make it look like stitching.

Tuesday, April 21, 2009


I needed a new sketch/inspiration book so I created this one by altering a composition book. I always buy a bunch at the back to school sales. I covered it with some beautiful vintage looking paper I found on sale at Jo-ann's. I stamped the butterfly from The Angel Company's "Bug me anytime" set in Palette's burnt umber ink. It is hard to see in the picture but there is a piece of beige paper under the pink that the butterfly is stamped on. I placed the beige paper at an angle so that it kind of looked like a diamond. I tore the edge on pink paper I added to the spine of the composition book as well as adding some eyelets to it. I then sanded the edges of the notebook to give it a used look.


Andy saw the altered sketchbook I had made for myself and he wanted one for school too. I took blue cardstock and covered the front and back with it. I did not put anything on the spine of this one. I thought the black contrast looked nice with this one. I added a blue and green eyelet to the two front corners. I then stamped Andy's name using Stampin' Up's "On the edge alphabet" stamp set. The stamp on the front is from The Angel Company's "Kid Praises" set. I layered orange, red and green cardstock under it to add some dimension. Andy just loved it. The "You Rock" stamp is his favorite. Anytime I stamp something for him, that is the one he asks for!


I have this thing for butterflies and vintage looking paper right now. I made this card for a friend's birthday. It is again The Angel Company's "bug me anytime" set.


This is the butterfly gift set that I made to go along with the butterfly birthday card in the previous post. It is hard to see in the picture, but that is a mini canvas bag stamped with the butterfly. I altered a mini notebook and then added some of the vintage paper to the inside of the pen to make a cute matching set.